General
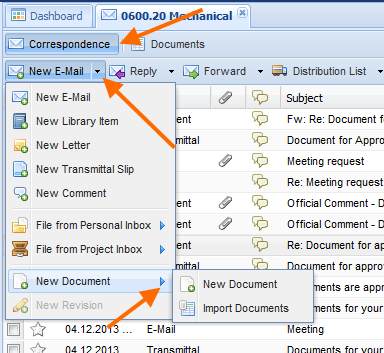
There are two different options to create a new document depending on the view you are currently working in. If you are currently within a correspondence view e.g. the correspondence view within a certain folder as illustrated in the first image below, you first need to click the small arrow head on the right hand side of the new e-mail action and then select the option "New Document".
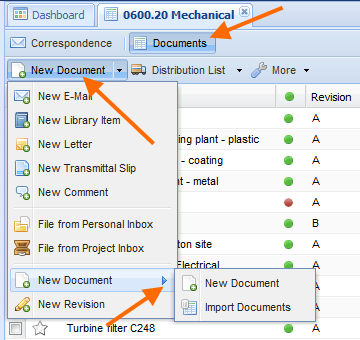
Should you however already be working within a documents view you will be able to directly click the "New Document" option as indicated in the second of the following images.
In both cases, you can also choose to upload documents using an excel file. To learn how to upload documents refer to the chapter Import Documents.
The document header
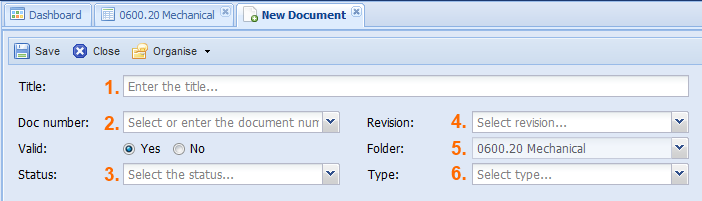
The layout of the new document is similar to the layout of correspondence files. The header bears all important general document information such as its title, type and folder while the content tab structured underneath contains all document details. Following table will briefly explain all header fields and their supposed values.
| # | Field-Name | Description |
|---|---|---|
1. |
Title |
The title field allows you to allot a short subject matter to the document that will help to grasp the purpose of a document without having to open its content. |
2. |
Doc number |
Unlike the reference number which is created automatically the document number can be entered manually, chosen from a list that offers company specific code combinations or created with a step by step selection. |
3. |
Valid |
The valid field is set on yes by default since it is most likely that no new document will be created that would already be invalid. Of course the document can be set on invalid at any point, but usually it is custom that a document becomes invalid as soon as a new revision of the document is created. For more information on the validation process of a document and its revisions please refer to the chapter "Create new revision". |
4. |
Status |
Generally a document will pass through various statuses during the course of a project, e.g. "Draft", "Send to customer", "Approved by PM" etc. The number and values of the statuses provided as selection in this field is set by your company and therefore customized to fit your needs. |
5. |
Revision |
It is custom that a document runs through more than one revision. Customers might have change requests or, due to changes in the project, a document might have to be adjusted. To insure that all changes can be traced, tracked and if necessary reversed with each modification a new revision must be created. The numbering (e.g. from 1 to 99) or lettering (e.g. from A to H) standard is also set by your company to reflect your customs. |
6. |
Folder |
As mention in earlier chapters each file stored or created within PIRS must be allocated to a specific folder. In case you have created a new document out of a folder, this folder will be automatically selected as allocation; otherwise you need to select a folder manually. |
7. |
Type |
Similar to the status field the type field value is being provided by your company. The type value will help you categorize the different documents and later also to filter the documents more easily. Type can be for example "Drawing", "Offer", "Order", "Specifications" etc. |
Since the document header contains the most important and essential information, its content will be displayed centrally in read mode as well.
Select a document number
As mentioned above PIRS offers different options to select a document number. Depending on the PIRS settings chosen by your company you will either have the option to enter a document number manually, select a document number or have it generated automatically based on other field values that you are required to enter. When entering the number manually you are able to assign a special document number. If you use the PIRS document numbering wizard you can pick a code combination that is predefined as a standard within your company.
Select a document number using the Document Numbering Wizard
In order to select a document number click the arrow head symbol ![]() .
Depending on your company setting one of the two possible selection windows will appear.
.
Depending on your company setting one of the two possible selection windows will appear.
The first option will display all code combinations available to you. By clicking the category columns you can sort the content of the respective column and as you can see in the following image, the doc number that will be entered will be presented to you in a preview. The categories are company specific and can represent your different departments, teams, geographical regions etc.
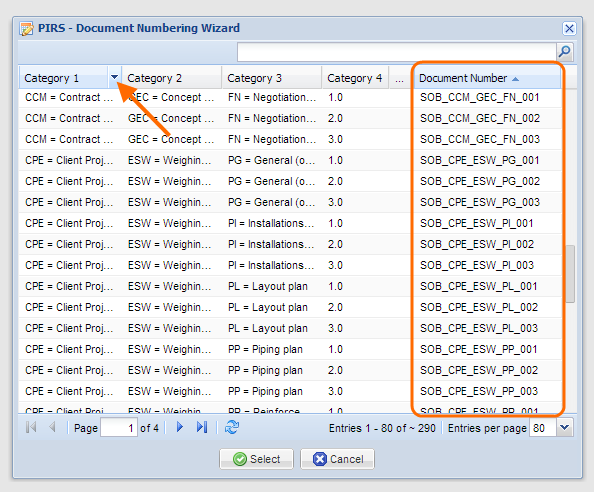
As a second option, the numbering wizard will display the categories as a separate pick lists. Here you can select a value for each category, step by step. The final document number is also shown in a preview.
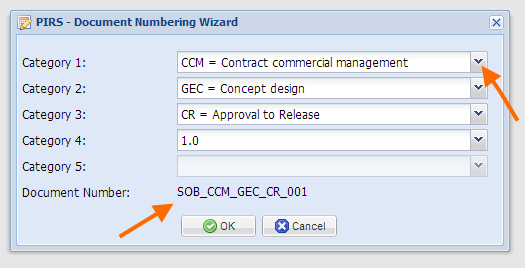
In both selection options, the Document Number used by the Document Numbering Wizard will be based on the category combination that you select. The number can consist of the code combination indicated by the categories and it is also possible to include a general prefix as displayed in the examples above where the prefix "SOB-" has been set up. But the number could also have no visible connection to the chosen category combination and consist of any number and/or letter combination used by your company. For both options all available document numbers must be uploaded and stored in PIRS.
The number of categories offered to choose from depends on your company specific requirements. Should the code combination that you require not be within the displayed options, please contact your project manager or our PIRS service desk.
Furthermore, there is a third option, which is very similar to the step by step selection. Here, you will also pick the categories according to the respected document requirements. The wizard will generate the document number based on the selected categories plus an automatically generated sequential number. For this selection option it is not necessary to store all available document numbers because they are generated according to the category selection and distinguished by the sequential number.
Generate Automated Document Number
PIRS can generate a document number based on meta information you are required to enter prior to saving a new document.
In case your company has decided to have document numbers generated automatically, the field "Doc Number" will not be editable (regard the following screenshot).
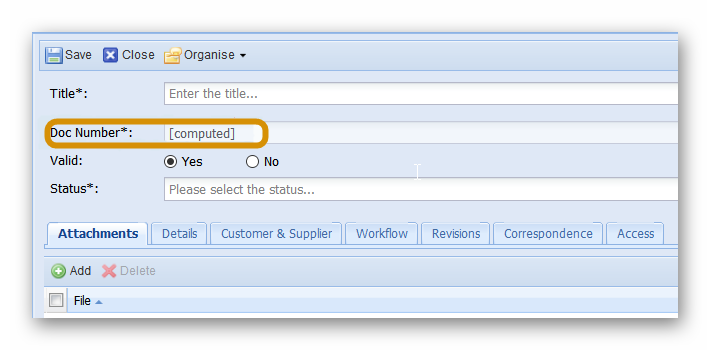
All mandatory fields marked with * symbol need to be filled. Some or all mandatory fields will be used to compute a unique document number.
Once all mandatory fields contain a value, you can save the document. During the saving process the document number will be generated and assigned to your document.
The document content
Upload your files to PIRS
The actual document (e.g. a technical drawing, once in PDF format to send to the customer and once in CAD format to continuously edit the drawing) can be attached to the PIRS document either by using the "add" button in the attachment content tab or via drag and drop.
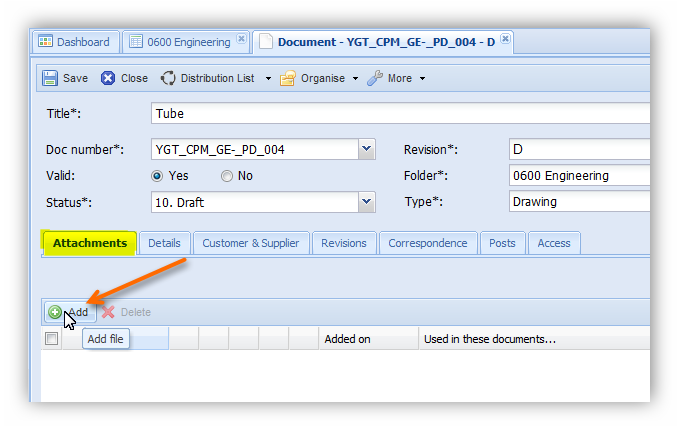
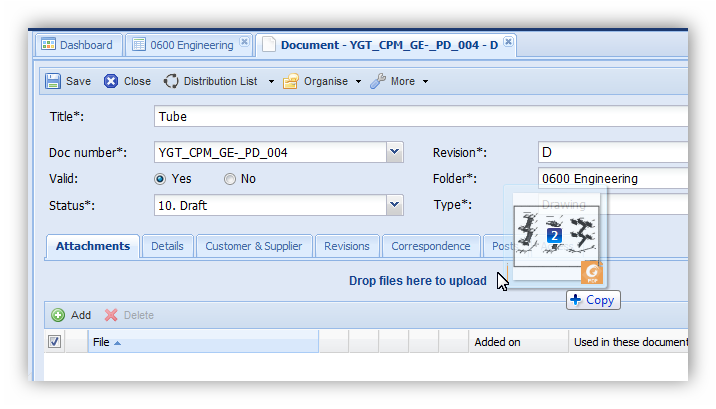
In both cases the selected files will be uploaded to PIRS form your local server or your local PC.
Besides the column "File" that will show the names of the uploaded files there are two more columns that provide you with additional information. The column "Added on" will display the date and time when the individual file was uploaded to this PIRS document (compare with screenshot below).
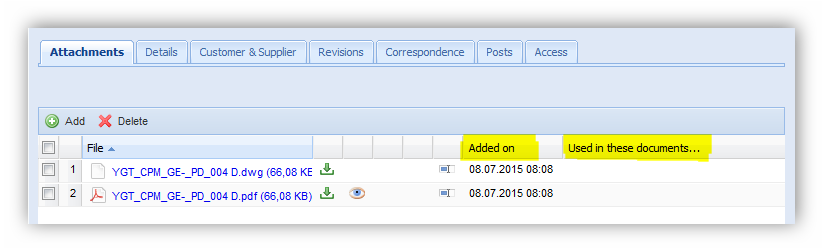
The column "Used in these documents…" shows you if a file was distributes with a transmittal slip or commented on with a PIRS comment. In case one file was transmitted but the other wasn’t the respective transmittal slip will be displayed in only one row.
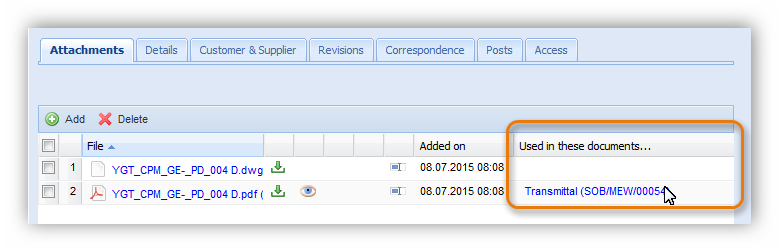
This additional information allows you to keep track of the individual distribution of each file attached to a PIRS document because it shows all transmittal silps and comments related to each file individually. By clicking on the displayed transmittal it will open in a new PIRS tab.
Add detailed information
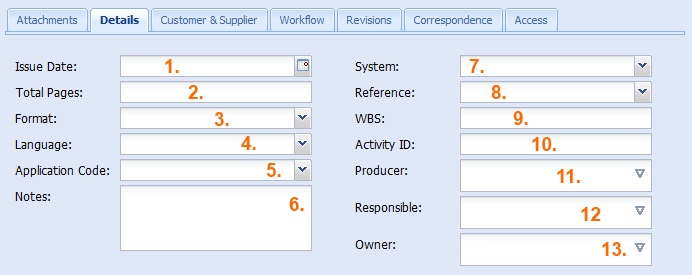
The second tab allows you to enter detailed information about the attached document (compare with the image to the left). None of the fields have to necessarily be filled with a value however. All field descriptions are listed in the following table.
| # | Field-Name | Description |
|---|---|---|
1. |
Issue Date |
Within this field you can enter the original issue (creation) date of the document attached to the PIRS document.
The issue date can but must not necessarily vary from the creation data of the PIRS document.
You can either enter the date manually or select it form the calendar that will open as soon as you click the calendar symbol ( |
2. |
Total Paper |
Here you can enter the number of pages the attached document has. |
3. |
Format |
Within this field you can store information about the document format that might be important e.g. in case a project member chooses to print the file and needs to know if the document has a DIN A 4 (the German regular paper standard) or a DIN A 5 format |
4. |
Language |
This field lets you enter information about the language in which the document has been composed. |
5. |
Application Code |
Here your company can lodge a list of keywords for certain required components e.g. construction components. |
6. |
Notes |
The notes field is a free text field which allows you to enter any information that might be of importance to other project members and that is not provided by any of the other fields. |
7. |
System |
Similar to the Application Code field, the system field can be used to lodge a list of keywords. |
8. |
Reference |
Here also reference keyword lists from your company can be stored for you to choose form. |
9. |
WBS |
WBS stands for Work Breakdown Structure. Here you are able to define which WBS should be applied if there are different standards specified in your company or you can enter your own specifications. |
10. |
Activity ID |
In this field identification keys e.g. for different sites, locations etc. can be lodged. |
11. |
Producer |
The producer is the creator of the attached document. He or she can be internal as well as external depending on the type of document and your company’s internal and external structure. |
12. |
Responsible |
The responsible is the internal project member who has to approve the document and insure its quality as well as its flawlessness. |
13. |
Owner |
The owner of the document represents the interface to external parties. He is responsible for the quality and flawlessness of the document towards the customer/supplier/partner. |

Document Follow up information
The third tab allows you to handle, process and store follow up customer and supplier information, which is especially interesting for the controlling department and the top management since based on its information, performances can be evaluated.
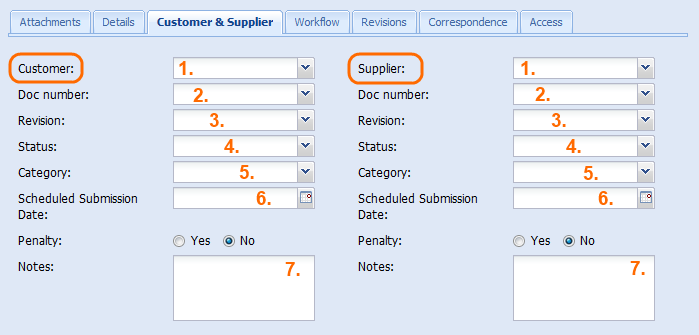
| # | Field-Name | Description |
|---|---|---|
1. |
Customer / Supplier |
Within this value field you can select your customer / supplier who will receive / provide the technical document form the project address book. |
2. |
Doc number |
Your customers/suppliers document number is seldom the same that your company uses. But since your customer/supplier will be more likely to refer to documents using his own numbering system, these fields enable you to also store customer and supplier document numbers. It therefore becomes possible to search a document by its customer/supplier number if necessary. |
3. |
Revision |
A document that is marked as revision A within your company can easily be stored by your customers/suppliers under a different revision or using another numbering system. To keep track on your customers/suppliers development PIRS also allows you to follow your customer and suppliers revisions. |
4. |
Status |
Similar to the revision, the status of a document may vary out of the respective of your customers/suppliers. A document listed within PIRS in the status "Send to customer“ might for example be listed still as a "Draft" or your customer/suppliers might work with a different number and values of statuses. This field lets you follow your customer/suppliers activities. |
5. |
Category |
Within the category field a list of values or keywords matching e.g. your customer/suppliers internal department structure or their document types, can be lodged and displayed in the option list. |
6. |
Scheduled Submission Date |
This field enables you to enter the date when you have to transmit the technical document to your customer/supplier. |
7. |
Penalty |
The Penalty field shows if according to your contract with the customer/supplier a penalty is to be expected. |
8. |
Notes |
Similar to any other "Notes" field you are able to enter any additional information about customer/supplier settings that were not addressed with the fields above. |
Document Revisions and Correspondence tab
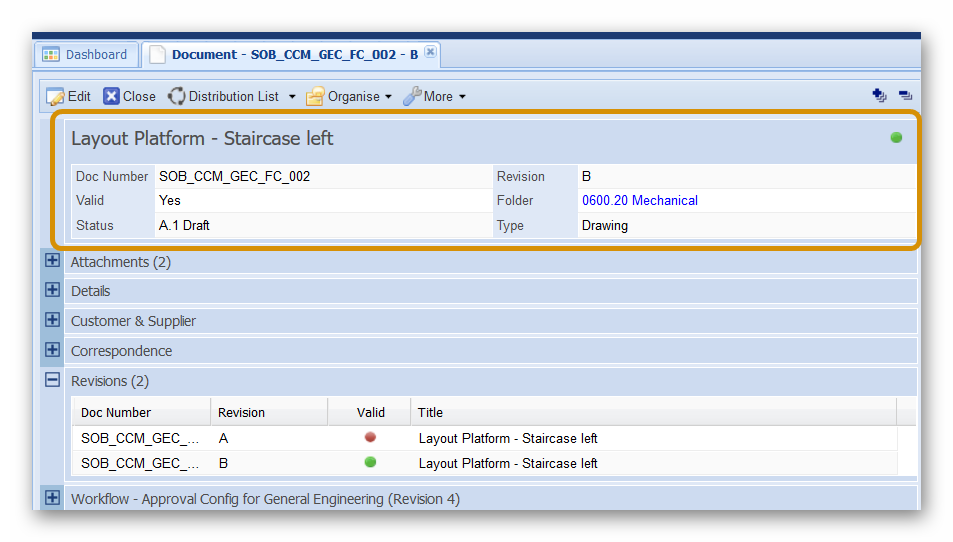
The revisions tab will present you with a list of all the existing revisions for this document which can also be accessed out of this tab. If a document has just been created there are not yet any other revisions listed, but a newly created revision document will be visible within this view as soon as you save the file. For more information on revisions please refer to Create new revision.
The correspondence tab will show you correspondence files like transmittal slips and comments that have been sent and that are linked to this document. Since this exemplary document has not yet been send via transmittal slip this tab would be empty at this point. In the following chapter however, all the steps of creating a transmittal slip to send documents will be explained in detail and at that point the correspondence tab functions will also be presented. For information on the setting of access rights available in the last content tab please refer to Manage access rights.