The Correspondence Views Action Bar
Each view that can be chosen to categorize and present the different correspondence offers a similar action bar that includes all possible features available within the respective view. In order to facilitate the operation of the action bar, its general layout has been mostly based on the features offered in any regular email account. All functions and features offered by the actions within the correspondence action bar will be addressed in the course of this chapter.
Create a new email
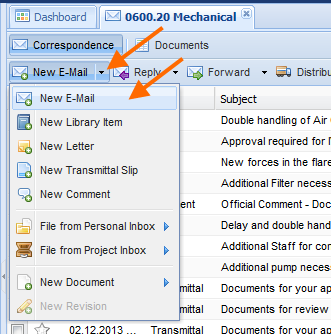 To create a new email either click directly the "New E-Mail" button (the first button in your correspondence action bar) or use the small arrow in the corner of the button to expand all your options to create new items of different types and select "New E-Mail".
The new email will now open in another tab in your content screen.
To create a new email either click directly the "New E-Mail" button (the first button in your correspondence action bar) or use the small arrow in the corner of the button to expand all your options to create new items of different types and select "New E-Mail".
The new email will now open in another tab in your content screen.
Any action bar regardless of the view you currently display, will have a "New…." button in the far left of their action bar. It is therefore not necessary to switch to a correspondence view to create a new correspondence document.
Email fields and options
The new email document will already include your data as author of the email which also means that your picture will be displayed if one is attached to your contact form within the project. In case you have entered your personal company signature within your contact settings, it will also be inserted into the body field. (For information on how to upload your personal image and adjust your contact settings, please refer to the chapter Address Book.)
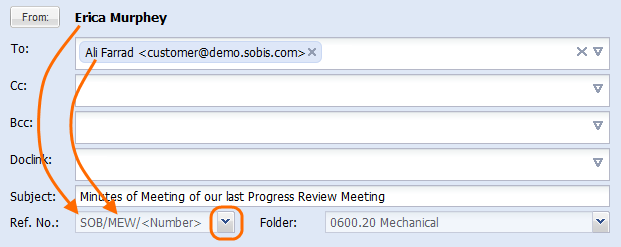
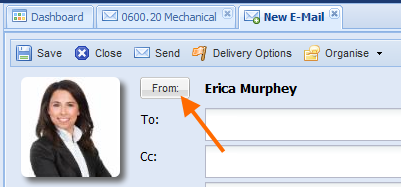 As indicated by the image, PIRS enables you to change the sender of the email prior to sending the email by clicking "From" which as result will present you with all the contacts from the address book.
This function can be used e.g. to support or represent your team members while they are on vacation or out sick.
It should be mentioned at this point however that as soon as you create any type of correspondence or document a log file will record all modification from each PIRS user individually.
The log file feature will be introduced more closely in a later section of this chapter.
As indicated by the image, PIRS enables you to change the sender of the email prior to sending the email by clicking "From" which as result will present you with all the contacts from the address book.
This function can be used e.g. to support or represent your team members while they are on vacation or out sick.
It should be mentioned at this point however that as soon as you create any type of correspondence or document a log file will record all modification from each PIRS user individually.
The log file feature will be introduced more closely in a later section of this chapter.

Most of the fields in the header of the email document equal those used in the various email account providers. To ensure that all functions and features within your email correspondence template can be used to its full scope of operations, all value fields will be explained separately in the following table.
| # | Field name | Description |
|---|---|---|
1. |
To |
Here you enter email address of the recipient(s) of your email. They can either be typed in manually or selected directly from the project address book. To select contacts from the address book you need to click the small arrow positioned at the end of the field which will expand a table containing all stored contacts. If the contact is filed in the project address book you also have the possibility to enter only parts of the recipient name and the application will offer you a small list of contacts that fit your entered letter combination for you to choose from. You are able to either remove contacts individually or remove all added contacts at once by clicking the X in the right corner of the field. |
2. |
Cc |
Similar to the "To" field you can add or remove recipients that you wish to send the correspondence to in form of a copy without directly addressing them. |
3. |
Bcc |
As with the two fields above you can add or remove recipients. Those recipients will receive a copy of the correspondence but there contact will stay hidden to all other recipients. |
4. |
DocLink |
The DocLink feature is a special option offered within PIRS. All contacts that are added in this field will receive an email that contains a standard text and a link leading to the correspondence document within PIRS. Please remember that recipients that you send a DocLink to need to be able to access PIRS in order to be able to open the link within their browser. |
5. |
Subject |
This field offers you the opportunity to assign a subject to your correspondence. Depending on your company’s configuration this entry will either unaltered or in combination with the reference number be displayed as subject matter in your sent email. |
6. |
Folder |
As mentioned before each correspondence as well as document must be filed in one specific folder. If you choose to create a new email within the correspondence view of a folder, this folder will automatically be the assigned folder. In any view however you have the possibility to alter the folder |
Move or quickly delete recipients
Since Release 3.5. you can easily change or move recipients from one field to the other which comes in handy especially when your recipient lists are a bit longer.
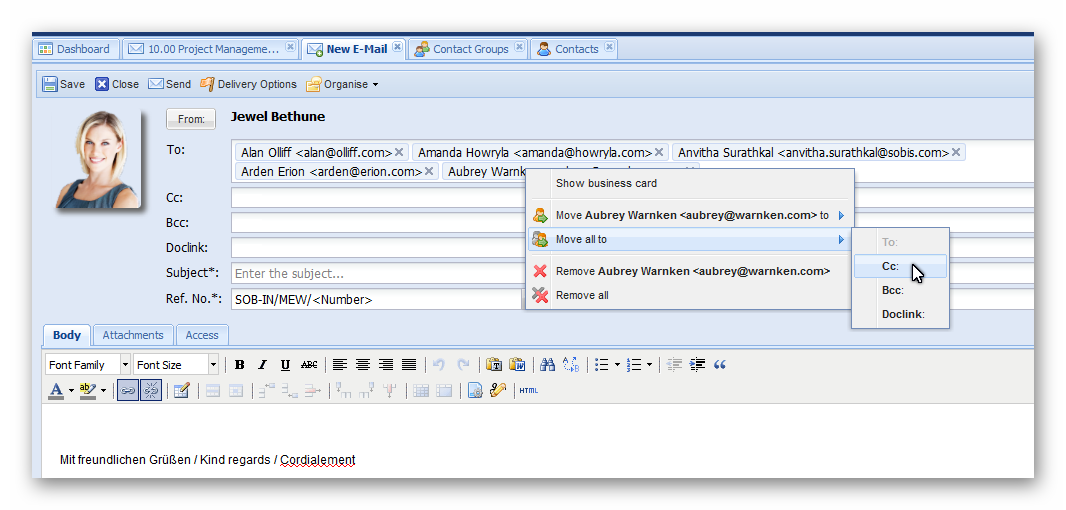
As indicated by the screenshot, PIRS will offer you several options once you right click on one recipient within your list. You can move or delete one recipient or delete all in one go.
Edit recipients from a PIRS group
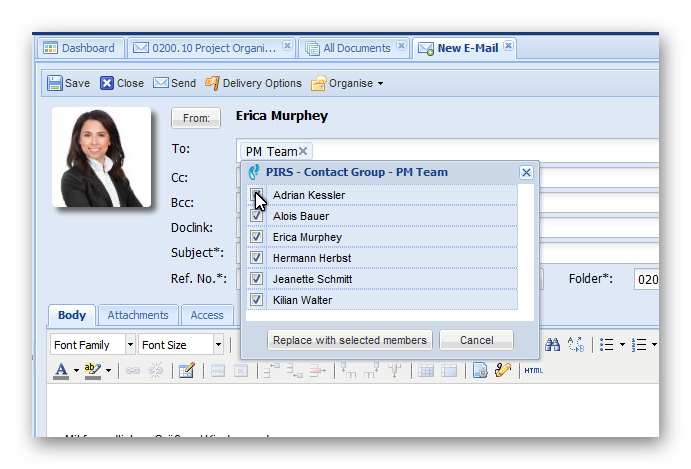 Within your PIRS Project address book you are able to create and manage contact groups.
Groups can be used to quickly enter all recipients of an email without having to enter or select each one manually.
Should you however need to edit the recipient list of the group, simply click on the group entry in your recipient field.
The list of group members will be displayed.
Deselect the users that should not receive this email and click "Replace with selected members".
Within your PIRS Project address book you are able to create and manage contact groups.
Groups can be used to quickly enter all recipients of an email without having to enter or select each one manually.
Should you however need to edit the recipient list of the group, simply click on the group entry in your recipient field.
The list of group members will be displayed.
Deselect the users that should not receive this email and click "Replace with selected members".
The reference number
One very important field within the header of a new email file is the reference number ("Ref. No"). Each correspondence file has an individual reference number.
By default, the reference number is composed of a sender code, a recipient code and a consecutive sequential number. The sender as well as the recipient code will be entered automatically according to the selected sender and recipient(s).
A sequential number will be assigned as soon as the mail is either saved or sent. As illustrated by the following screenshots you also have the possibility to adjust or modify both codes as well as the sequential number. You open the modification box by clicking the small arrow positioned in the right corner of the reference number field.
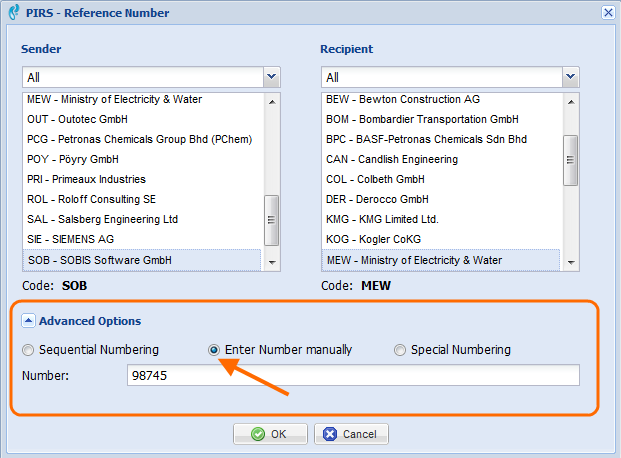
By expanding the "Advanced Options" you will be able to choose between either having a sequential number assigned to the end of your reference number, entering the number manually or entering a special reference number.
In case you want for example enter a number specified e.g. by your company’s configuration regulations, you can select "Enter Number manually". At the current configurations within PIRS the manually entered number must consist of exactly 5 digits.
After confirming by clicking "Create new Reference Number" your selected information will be inserted into the respective field.
The option "Special Numbering" allows you to not only select the third part of your final reference number but to create a sequence of letters, numbers and / or symbols that will represent the entire reference number regardless of the sender and / or recipients. To allow users to easily determine sender and recipient information without having to open each file, the sender and recipient code will still be visible in brackets.

Email Body and Attachments
Similar to other well know email applications such as MS Outlook, PIRS offers standard formatting features in an action bar on top of the email body field. However as you can gather from the following images, there are two features that differ from the standards and will therefore be explained in detail.
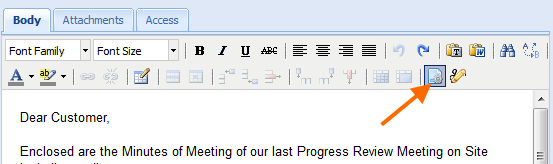 First of all you are presented with an option to insert different text template that can be individually altered, added and amplified by your PIRS administrator to fit your company’s preferences.
By clicking the symbol in the action bar, outlined in red in the screenshot below, you open a new selection window where all existing text templates are displayed in a table.
A preview of the selected template will be presented to you in a separate field.
First of all you are presented with an option to insert different text template that can be individually altered, added and amplified by your PIRS administrator to fit your company’s preferences.
By clicking the symbol in the action bar, outlined in red in the screenshot below, you open a new selection window where all existing text templates are displayed in a table.
A preview of the selected template will be presented to you in a separate field.
Another useful feature, represented by the  - symbol, gives you the opportunity to insert your signature which you can store within your contact document in the project address book.
By clicking the symbol your signature will be added to your body entry.
- symbol, gives you the opportunity to insert your signature which you can store within your contact document in the project address book.
By clicking the symbol your signature will be added to your body entry.
Attachments
Within the second tab of your email content tab structure you are able to add or delete attachments regardless of their format. As long as you haven’t saved or sent the email the left upper corners of the rows of the attached files will be marked red.
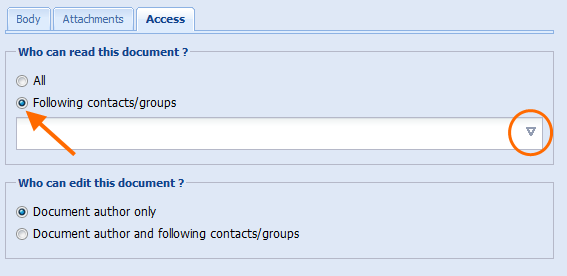
Setting Access Right
For each email that you create PIRS allows you to set individual access rights. To modify who can read and who can edit your correspondence enter the third tab as illustrated in the screenshot below.
By default the right to read a document is given to all application users while the right to edit a document remains with the author. Both settings can be modified to include or exclude certain contacts or groups. To select or remove contacts form either list you are offered the contacts / group selection options from the address book.
Please be aware that it is possible that access rights concerning certain folders may be predefined by the owner or the application administrators. In this particular case you will not have the default selection options or they might be restricted.
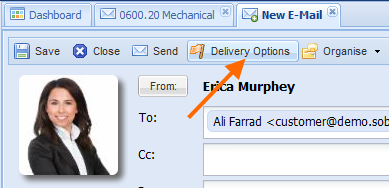
Sending an email
If you have entered values into all the required fields you can send your email by hitting the "Send"- button in your action bar. This operation will also automatically save the correspondence file within your previously selected folder.
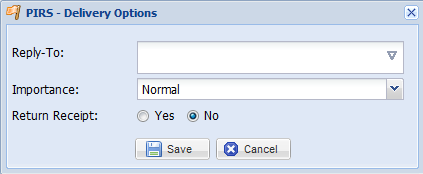
Prior to sending an email you have the possibility to select different delivery options as indicated by the following two screenshots.
You can select different contacts the possible reply would be send to besides you own.
Here it could for example be possible to select the project mailbox as reply address which would insure that the answer will automatically be stored within PIRS.
It is also possible to assign a degree of importance (high, normal, low) and you could choose to receive an information notice as soon as the recipient has obtained the email.
In addition, you have the choice to save the mail as draft and hereby enabling you to modify the email further at another time. After saving the document you will notice that there are more options in you action bar. You now also have the option to distribute the file to e.g. your project team members who can in turn give you feat back before you send a certain important email to your customer (for detailed information on the distribution of documents please refer to the chapter Distribution List). All additional options such as "Create PDF" and all the different selection options within "Actions" will be explained in detail in the course of the following chapters.